Pages

Friday, March 30, 2012

FZ1 Valve Adjustment Part III: Setting Engine Timing and Valve Re-measurement

March 03 - 04, 2012

Thanks to the FZ1 list I had a path forward for reinstalling the cams. I tried to make progress during the week but that's always difficult due to my work schedule. However I was optimistic that I'd have the bike back together by the end of the weekend.

Even with help from the list installing cams is frustrating. There are guide holes in the cams that are supposed to line up with marks on the cam holders when the signal generator "T" mark is aligned with the guide mark on the frame (Cylinder 1 at TDC on compression stroke). However due to valve spring pressure the camshafts don't rest flat in the engine. At first I thought I must have bent them somehow. But they weren't bent, they just rest at an awkward position with some of the cam lobes touching the valve lifters, lifting the cam out of the journals. The cam position shifts as the cam holders are tightened down. So the camshafts may start perfectly aligned with the marks on the cam holders and shift as they're tightened into position. Also, between the two cams there are 6 cam holders and 28 bolts, all of which need to be tightened in order, starting from the inside working out, with great care, in multiple stages to 88 inch pounds. In other words, numerous possibilities for stripping threads, rounding bolts, and causing other damage to the cylinder head. I was eventually able to get the process down to about an hour per cam, tightening finger-tight first, then in stages to 55 inch pounds, then in stages to 88.


Cams bolted in with cam sprockets removed
Guide marks visible on right side (exhaust) cam if you look closely

Note: During this process it is important to keep track of the location of the cam chain. It will want to fall toward the front of the bike, in front of the intake cam, during cam installation. Once the intake cam is installed, if the chain is in front of it, it is not possible to reposition it toward the outside of the cam where it belongs. The intake cam then has to be removed and reinstalled, which in my case took another few hours after realizing this.


Intake cam guide marks
Can be seen behind coolant pipe

With the cams bolted in the sprockets can be bolted in underneath the cam chain. The exhaust sprocket goes first, wrapping the chain around it as tightly as possible. A single bolt goes in the sprocket, finger tight, to attach it to the cam. Then the intake cam sprocket, also bolted in with a single bolt finger-tight. If the bolt hole in the intake sprocket does not exactly line up with the hole in the cam while the sprocket is meshed with the cam chain, it means one or both of the cams are not aligned correctly and must be repositioned and reinstalled. I had to do this more than once, taking at least an extra hour her per cam. However this does make it more difficult to reassemble the engine with the timing wrong.

Assuming one gets past that hurdle the cam chain tensioner must be reinstalled before the engine can be turned to attach the second sprocket bolt on each cam. There is a procedure in both manuals for retracting the tensioner with a small flat head screwdriver so it can reinstalled in the engine.

Having done that, if the valves have already been re-checked the cam bolts should be backed out one at a time in order to apply a small bead of blue threadlocker, then torqued down to 17 ft. pounds. If, as in my case, the valves need to be re-checked, the bolts should be torqued to spec without threadlocker as the cams may need to be removed again.


Cams and sprockets reinstalled, finally
But not for long...

Having finally reinstalled the cams I checked the valve clearances again and discovered two exhaust valves that were tighter than I'd like, two more I'd adjusted that were still too tight, and two intake valves that were too tight. Looking at my supply of shims I realized I was out of 1.75mm and 1.80mm shims with only 30 minutes till the local dealer closed. So I set out for the shop by bicycle and cleaned out their supply of those two sizes. Upon returning I set about removing the cams again. Another day gone.

Sunday 03/04 I did the second round of shim math and swaps, reinstalled the cams twice after getting the engine timing slightly off the first time, and rechecked clearances again. I still had four exhaust valves that were tighter than I'd like, right on the edge of spec. So I was faced with either removing the cams again and shimming the four marginal valves the following weekend, or deciding the situation was improved to my satisfaction and to take no further chances stripping threads or dropping shims in the engine. I decided on the latter, wisely, I think.

Sunday, March 25, 2012

FZ1 Valve Adjustment Part II: Measurement and Adjustment

Feb 25 - 26, 2012

After disassembly the next step is to measure valve clearances. This was surprisingly easy just following the procedure in the Clymer manual, although there are 5 valves per cylinder for a total of 20. Why so many?

Unfortunately my tapered feeler gauges are at 0.03mm intervals so it wasn't always possible to tell exactly what the clearance was, but easy enough to tell if a valve was significantly off. With the cams at the proper position, insert the feeler gauge that is one below spec. Hopefully that slides in easily. Then slide in the gauge that is in the middle of spec. Hopefully that goes in with a slight amount of friction. Then insert then next larger gauge that is slightly thicker than spec. With my feeler gauge set the gauge larger than spec shouldn't go in at all. The clearance specs are:

Intake: 0.11 - 0.20
Exhaust: 0.21 - 0.25mm

Using this technique I determined that all the exhaust valves were too tight, and all the intake valves were tighter than I'd like, but technically within tolerance. Unfortunately this meant there would be no question about removing cams. But I knew that.

Following the Clymer manual procedure I removed the cams with the sprockets attached, after making white-out marks on the cam chain and sprockets so I'd be able to reassemble them without changing the engine timing. That made sense to me because that's how the Bandit and SV650 cams are removed. The procedure calls for first removing the cam chain tensioner and gasket after removing its cap and winding it so it stops putting pressure on the cam chain. Then tying up the cam chain with wire so it doesn't fall into the engine. Next removing the cam holders by loosening the bolts in stages, in a criss-cross pattern starting from the outside. Finally removing the cams. Unfortunately removing cams with sprockets attached was a mistake as I found out later. In the meantime I was able to pull the buckets with a stick magnet and check the shim size.


Cams pulled with sprockets attached, cam caps, and a fly


Cams removed showing tops of the buckets


Pulling buckets with magnet

Note: The correct procedure for removing cams involves positioning the engine at TDC on the exhaust stroke ("H" mark aligned with mark on frame), removing cam sprocket bolts, then turning the engine back to TDC on the compression stroke ("T" mark aligned with mark on frame, cam lobes pointed away from each other), then removing the remaining cam bolts. Finally removing the tensioner and the cam holders.

The cam holders are marked, so if one is familiar with the markings they won't get mixed up even if they're not stored in the proper position. The buckets, however, belong to a specific valve and must stay with that valve. So it was important to carefully store all the parts in order. The buckets are not labeled and have no distinguishing features.


Exhaust valve buckets, in order, with their shims

Here are the valve clearances and the exhaust valve shim sizes I found underneath the buckets.


Valve clearances

Shim Math

After pulling shims it's necessary to determine what shim sizes are needed to set the valves back within specification. From the Clymer manual the formula is:

New_shim = (measured_clearance - spec) + old_shim_thickness


So, if I want to set an exhaust valve to the middle of spec, 0.23mm, my measured clearance is 0.15mm, and the old shim thickness was 1.85mm, the new shim would be:

(0.15 - 0.23) + 1.85


Resulting in a new shim measuring 1.77mm.

Unfortunately aftermarket shims come in increments of 0.05mm, so my available options would be 1.75 or 1.80. More math:

1.80 = (0.15 - x ) + 1.85
1.80 = 2.00 - x
1.80 + x = 2.00
0.20 = x

1.80 won't work because it would result in a clearance of 0.20, which is 0.01 tighter than spec. Better to go with 1.75, which should result in a clearance of 0.25.

One additional complication, it's important to measure the shims that come out of the bike to make sure they're actually the size they claim to be. If they're worn so that they're not the indicated size, of course the math has to be done according to the actual size, not the indicated size. There is a chart in the Yamaha service manual that helps with this.


Measuring shim with digital micrometer

The new shims should go in number side up and should be seated correctly. They are a tight fit and it's easy to seat them at the wrong angle. They should be flat relative to the rest of the valve, and not stick out of the shim seat much at all.

Cam Reinstall
After installing the new shims the cams need to be reinstalled and the valve clearances double checked. The cams and everything they come into contact with need to be lubed with molybdenum disulfide grease during reassembly. So I did that and was eventually able to get the cam sprockets back underneath the cam chain. However the other ends of the cams, the non-sprocket end on the left side of the bike, were sitting high up off the engine and didn't seem to want to sit on the buckets properly. I got the feeling I was applying too much pressure to the cams to get them seated properly and thought I must be doing something wrong. Not knowing what else to do I asked for help from the FZ1 list and waited. They were quick to respond, but I'd wasted a lot of time trying to get the cams in with the sprockets attached, and the day was pretty much done.

It turns out that the Yamaha service manual has a different procedure for cam removal and the folks on the FZ1 list assumed I followed the Yamaha procedure. Yamaha says to remove the cam sprockets while the cams are still installed in the engine, and reinstall the cams without the sprockets attached. So I had to figure out how to remove the sprockets with the cams out of the bike, in order to reinstall the cams. Eventually I was able to accomplish this using the cam chain to hold the sprockets, while I kept the engine from rotating with one hand and loosened the cam sprocket bolts with the other. It was really awkward and there was strong threadlocker on the sprocket bolts. I'm lucky I didn't round any bolts or break anything. In retrospect it probably would've been better to remove the bolts with an air wrench and 10mm impact socket, but I didn't have an impact socket of that size lying around. It would have been better to have taken a break and gone to the hardware store.

Saturday, March 24, 2012

FZ1 Valve Adjustment Part I: Disassembly

Feb 24, 2012

I was anticipating this day without much enthusiasm as my Yamaha approached its second valve adjustment interval at 52k. The local dealer quoted $540 in labor plus parts to do this service so I figured I'd end up doing it myself. The last time I checked valve clearances on the FZ1 it was out of commission for 3 weeks and I didn't even pull cams to replace shims. This time I knew I'd have to because the specs were on the tight side several years ago at 26k. Ultimately with the help of the FZ1 Owner's List I was successful in getting the valves in spec and getting the bike running again, but it was out of service for three full weekends and a vacation day. I learned a lot about the bike and was very humbled as far as any pretensions of mechanical aptitude.

As the mileage approached I bought the gasket set: valve cover, cam chain tensioner, and signal generator cover gaskets, also iridium spark plugs. I double checked my supply of 7.48mm shims, coolant, distilled water, and micrometer batteries. Having done all that I was out of excuses so I took a Friday off work and got started.

The first step after removing the battery is to drain the coolant and remove the radiator. The very first thing that has to be removed is the right side cowling panel to access the radiator cap. I dropped one of the three cowling mounting bolts and spent an hour looking for it. It had landed in a crevice in my hydraulic jack underneath the work bench. Off to a great start.

The tank has to come off (2 bolts, 3 hoses, and an electrical plug) to access the radiator fan's electrical plug. I removed the right side plastic panel in order to access the coolant overflow tank and extract what coolant I could. This was all per Clymer manual.

Next I removed the radiator. This is only two bolts, three hoses, and the fan electrical plug. I had to lube the water pump hose with Tri-Flow in order to get it detached from the radiator, and got a big blob of Tri-Flow in the eye. After spending the next 10 minutes running water into my eye I remembered about safety goggles. Other than that, not too difficult.

Next, the Air Induction System. The AIS is a a spider-like mess of steel and rubber tubing running over the top of the cylinder head cover toward the front of the engine, terminating in a large cube-shaped valve toward the carburetor on one end, and 4 ports near the exhaust headers on the other:


FZ1 AIS System
Photo Courtesy FZ1 Owner's List

It is difficult to remove and even worse to reinstall. Many FZ1 owners remove it permanently using an aftermarket kit, and after this service I considered it. I'm all for clean air, but seriously. This is one of the most difficult parts of the procedure. Thankfully Pat's FZ1 Site has tips for removing it with great photos. The manuals aren't much help. It's still a lot of messing around to thread the big blocky AIS valve through all the other wires and tubes on the bike, but it is possible, eventually. According to Pat's site it is removed via threading through the tubing from the top of the bike, although I managed to get it out from the front of the engine after removing plug wires #3 and 4 and the valve cover right side coolant hose. This is not the way it went back in however.

After AIS removal there was one remaining coolant hose routed through the left side of the cylinder head cover that had to be removed in order to remove the valve cover. That wasn't too bad although some coolant dripped out for awhile.

With the radiator and AIS out it's easier to access the spark plugs so I unplugged them, moved the leads out of the way, and removed them. First I tried a 5/8" spark plug socket and found it was a little tight in the plug recess. Then it got stuck in the plug #1 recess. Panic moment, but after an hour of messing around with a socket extender, a needle nose pliers, and a wire coat hanger I was able to get it out of there. Then remembered last time I'd used the plug socket that comes included in the FZ1 tool kit. This and a 14mm wrench worked much better.


View with tank removed and spark plugs unplugged

After removing the plugs I stuffed shop towels into the recesses to prevent things from falling into the cylinders.

Finally the cylinder head cover comes off by loosening the 5mm hex bolts in a cross-cross pattern starting from the outside. It came out on the right side of the bike.

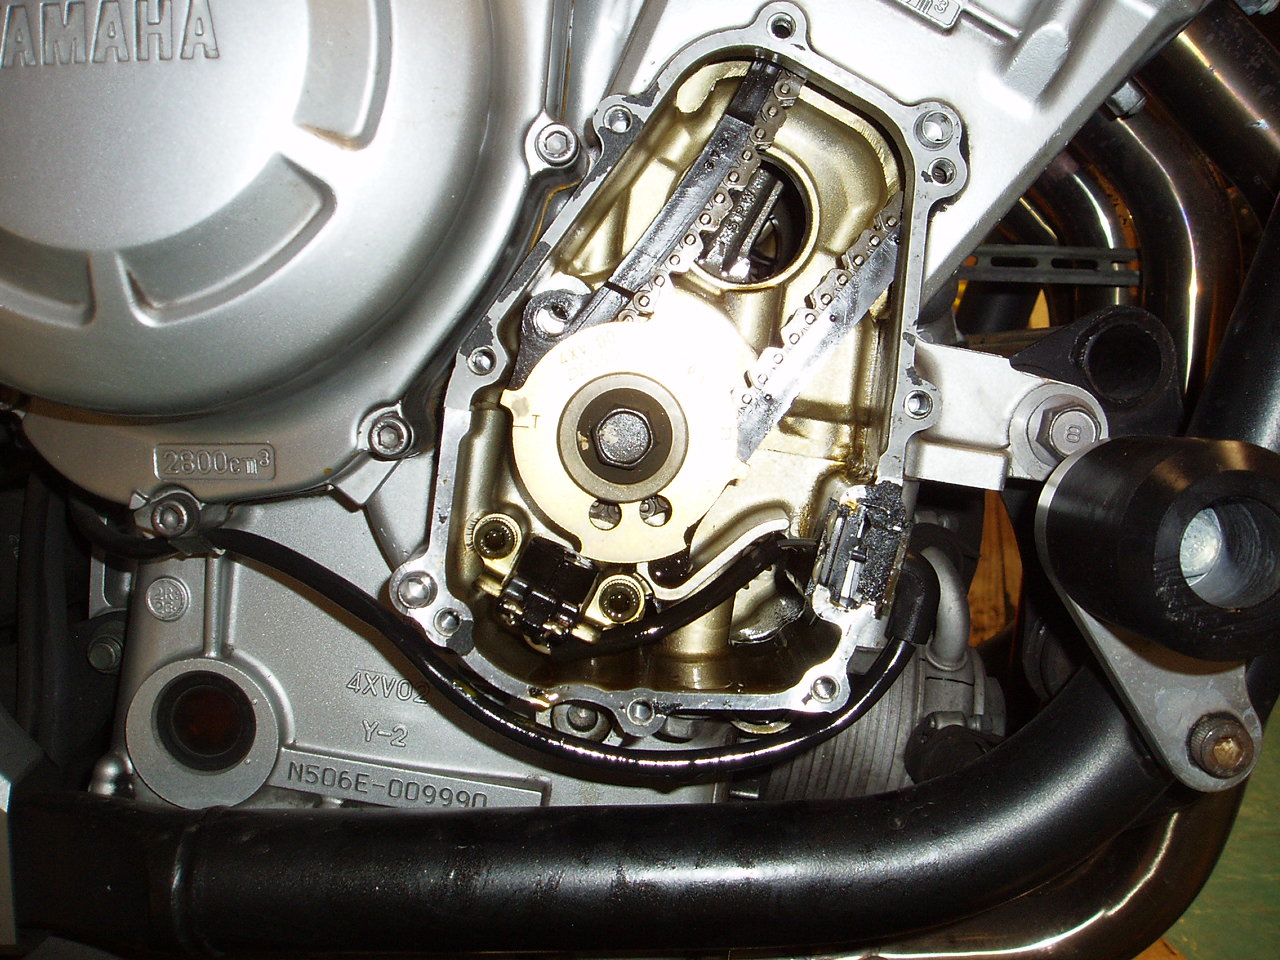
Next, in order to rotate the engine for valve clearance measurement, I removed the signal generator cover (5mm hex). Some oil seeps out of the engine when the cover is removed, so I put a drain pan underneath it. There are two long bolts, one at the top and the other at the bottom of the cover. Also a wire clip and a metal locating dowel that keeps the plastic cam chain guide in place. The locating dowel goes through a hole in the chain guide which aligns with a hole in the engine. The procedure calls for removing the cam chain guide which I didn't do. It's possible I should have as it was difficult to get the chain guide lined up to put the locating dowel back in. From the last photo you can see the cam chain guide hole is out of alignment with the guide hole in the engine.

Here are some views of the bike with the removal steps completed:


Front view: radiator, AIS, valve cover removed
Corrosion from two Salt Flats trips


Cam position for cyl 1 intake and exhaust valve check
Cylinder 1 at TDC on compression stroke


Signal generator in position for clearance check on cylinder 1
Note position of "T" mark

Having completed disassembly about 8 hours into it, I called it a day.

Sunday, August 28, 2011

Curse of the Leaky Petcock

It's been quite awhile since I've had time for a blog. These days I'm doing much less in the way of motorcycling, bike maintenance, and interesting road trips, and a lot more work-related travel and projects in my spare time. That's the way careers go I guess. I've also started commuting via combination of bicycle and public transit several times a week to save some wear on the motorbikes, at least while the weather's nice. Bicycles don't seem to require near as much time, effort, or money to keep running.

This weekend however, I celebrated being off the pager by ignoring work responsibilities and tending to a long-standing issue I've had with the Bandit. One thing about old air-cooled Bandits, sometimes they're leaky. I replaced the head gasket at 16k because it was oozing a little oil. After the Alaska trip the rear caliper bleed screw started oozing a little. The valve cover is currently leaking a little oil at one of the oil journal bolts. And finally, the gas tank has been seeping gas at the petcock seal since before the Alaska trip. This has been an ongoing problem.

Before the trip I replaced the tank/petcock seal o-ring, which stopped the leak for about a week. I noticed a thin sheen of gas under the tank during the trip. When we got home I replaced the gasket again, this time carefully scraping away all the paint, which had started to peel, on the tank sealing surface. This held it again for about a week. Not one to be intimidated, I bought another o-ring and some Hylomar sealant. Again, this held it for about a week.

Not knowing what else to do I bought a fourth o-ring and brought the bike in for its first shop visit in 7 years[1]. The Vallejo Suzuki dealer[2] cleaned out all the sealant and cleaned off the sealing surfaces, then replaced the gasket. The tech said the petcock bolts were loose and suspected that was why it was leaking. $90 well spent, I thought.

So when it started leaking again in another few weeks I left it alone. Like the rest of the Bandit's leaks it was very slow and didn't seem to be dangerous or affect performance. Eventually I explained the saga to my friend Mark who said he'd sealed a leaky gas tank vent with something called Seal-All


So I figured I'd give it a try. I removed the tank, discovering one of the three vent hoses was disconnected. This particular hose has a spring clamp so I'm wondering if Vallejo Suzuki left it that way.

I unbolted the petcock and applied Seal-All to the sealing surfaces, trying to avoid getting any on the o-ring. Note that this should only be done while there's not much gas in the tank. Seal-All looks and smells like model airplane glue. I also put some on the sealing washers that go on the bolts. You can see all the paint I scraped off of the tank sealing surface in a previous attempt:


Finally, bolted the petcock back to the tank:


I'll let the sealer dry overnight, then put the tank back on the bike. I'll post in another week about whether or not attempt #5 was successful.


[1] Not counting a trip to Engine Dynamics in 2009 to get a heli-coil in the oil drain. Doh!
[2] I took the Bandit to Berkeley Performance first, but they said they were too busy to work on it.

Saturday, October 9, 2010

Yamaha FZ1 - Best Used Bike


I was really happy to see that Cycle World chose the 1st gen FZ1 for their "Best Used Bikes" column. My other bike is a 2003 FZ1, and I have to say Yamaha really outdid themselves when they made this bike. Along with the Bandit the 1st gen FZ1 is the last of the steel-frame UJMs and the ultimate in terms of price/performance. It has a comfortable upright seating position like the Bandit, a real R1 racing engine and components, large gas tank, and easy-to-read analog dashboard. It has the humble Bandit beat in power and braking departments, gets better mileage, and is a much smoother ride. My only quibbles are with the size and ergonomics. The FZ1 feels like a big bike compared to the Bandit even though it's lighter. It's longer, the seat is narrower and less comfortable, and the footpegs are higher so my legs are bent in a less comfortable position for long distances. Oddly I feel more cramped on the FZ1 even though it rides like a bigger bike. It's a bit harder to squeeze into tight parking spaces than the Bandit because of the wheelbase. This has not stopped me from putting in 600 mile days on the FZ1. It's a joy to ride and I can't say enough good things about it. Hit the throttle and it goes exactly where you want it to go, quietly and effortlessly. Whenever I see an '05 up for sale I'm tempted to buy it just to have a spare, so I'll never be without one. In my opinion it's one of the best kept secrets in motorcycling.

Sunday, October 3, 2010

Schwarzenegger Signs SB435

...AKA the Motorcycle Anti-Tampering Act. This was originally introduced by anti-motorcycle Senator Fran Pavely as an anti-smog bill which would require motorcycles to get regular smog checks like cars. The version signed into law makes it illegal to modify emissions systems on motorcycles made in 2013 and after, but doesn't require smog checks.

I am not a fan of air pollution or loud pipes. All my bikes are stock and I'm not planning to buy a new one soon. So this bill doesn't directly affect me. However laws don't have to personally restrict me to be bad laws. As a friend put it, it's a slippery slope when it comes to making someone else's freedoms into victimless crimes. Freedoms enjoyed by motorcyclists are being chipped away at one by one. Like previous motorcycle restrictions, this was a poorly conceived bill enacted by legislators wanting to look like they were doing something useful. First there was the helmet law in the mid 90s, then bridge tolls for bikes recently went into effect, now this. My concern is that eventually they will go after something really fundamental to motorcycle commuters, like lane sharing. All it takes is for one rider to buzz too close to Senator Pavely's car before this is a possibility. As motorcycles represent roughly 1% of the traffic on the road no one would be able to stop such legislation. If that happens I may as well ride the bus 30 miles to work instead of sit in traffic waiting to be a Bandit sandwich. The Hurt report backs that notion up. So share lanes politely people, it's not just road rage we need to be concerned with. Put another way, if you ride like an asshole and piss off someone powerful enough your freedoms will be taken away. Period.

The orginal article from the LA times is here.

Monday, September 27, 2010

How to Waste $72,000


People ride for a lot of different reasons. Some for a sense of adventure, some for a sense of freedom, some to belong to a subculture, others just for cheap and fun transportation. At $72k, buyers of the Confederate P120 Fighter obviously don't fall into the latter category. I can't imagine commuting, riding cross-country, wrenching, or doing pretty much anything I find appealing about motorcycling with this bike. Good thing I don't have a spare 72 grand.

Full LA Times review here.