Pages

Sunday, March 20, 2016

Bandit 1200 Carburetor Cleaning Part 3: Reinstallation

Reinstallation is mostly the reverse of removal.

Put a coat of light oil such as Tri-flow, WD-40, or 3-in-1, on metal-to-rubber contact surfaces, i.e. outside of carburetor air intake and throttle bodies, and inside of intake and air box boots. This will make it easier to reinstall carburetors and air box.

Reinstall rear throttle cable. This can be tricky.


Then reinstall front throttle cable and fuel hose.


Route fuel hose through rubber loop.


Push carburetors into intake boots. Rather than push them straight in, put the throttle bodies in at the bottom of the intake boots first with carbs tilted slightly upwards, then tilt them forward and down into the boots.


Slide the air box onto the air intakes. Be careful of pinching wiring harness on right side of bike. Screw in the intake and air box clamps.

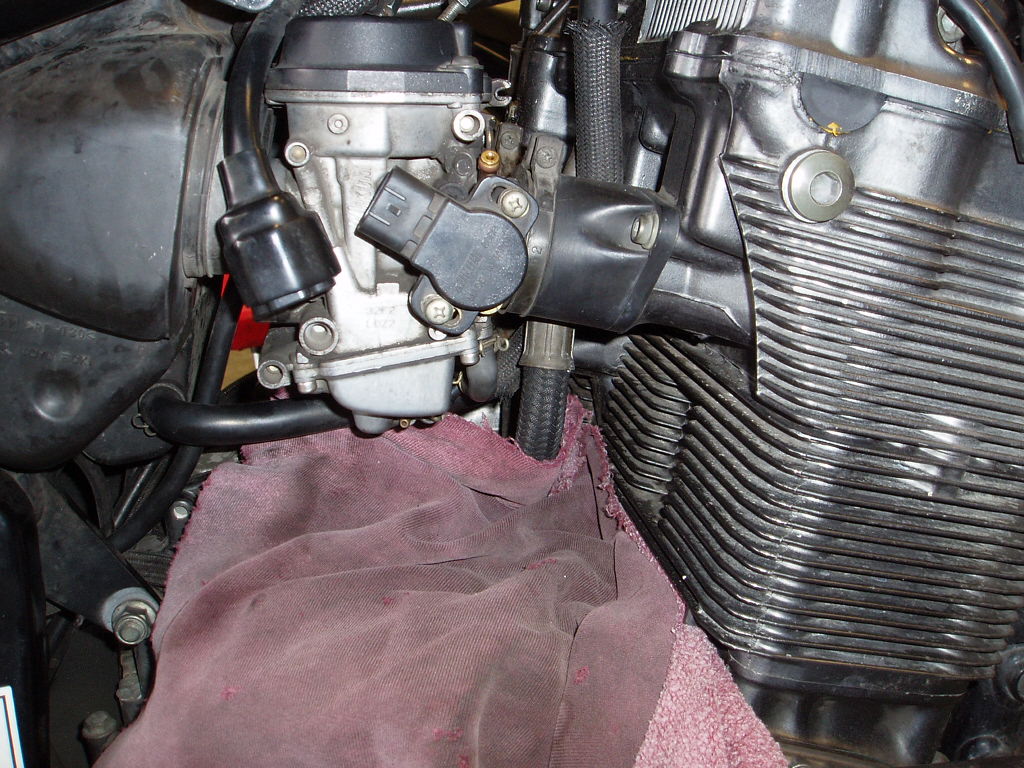
Reconnect TPS and overflow hoses.


Position and bolt in air box.


Reconnect carb 4 vacuum hose.


Finally, reconnect and adjust the throttle cables. Make sure there is plenty of slack at the carburetor end, then reconnect at the throttle end.


Reassemble the throttle grip housing. Note guide hole in handlebar which should line up with guide post on the top housing.


Then insert throttle cables into guides at the carburetor end.


Tighten the cables about one turn each at the throttle end--turn the adjusters clockwise as you face toward the front of the bike.


Then tighten the carburetor side of the cables until there is a little freeplay in the throttle grip.

Finally reinstall the choke cable. I replaced it because it was frayed. To replace choke cable:

Using a cable lube tool and Tri-flow aerosol, lube the new choke cable from the carburetor end.


Disassemble the left side grip housing and remove the old choke cable from the choke lever. Clean and re-grease the handlebar under the choke lever.


Remove the old cable, and route the new cable under the left front panel to the carburetor. Should not be necessary to remove the panel if you're careful. Install the cable at the lever end, and reassemble the left grip housing.


Re-connect choke cable at carburetor end.


Finally, reinstall the left and right side panels, and the fuel tank. Start bike and check for leaks and even idle.


Sunday, March 13, 2016

Bandit 1200 Carburetor Cleaning Part 2 - disassembly and cleaning

After cleaning the carburetor exterior each of them can be opened one at a time for cleaning. This procedure is a quick clean--I did not separate the carburetors and fully disassemble. This is just cleaning the jets and float bowls.

It is highly recommended to wear eye protection during this service.

I started at carburetor 1 (left side) and worked my way to #4. First, unscrew the black cap at the top and carefully remove. Be careful of a large spring right under the cap that will want to pop out. In this case the spring has been shortened for smoother deceleration response. Important--the cut side goes down when reassembling.


Carefully peel up the black diaphragm and remove it. The large slide needle will come out with it. There is a small o-ring at the front of the carburetor. Important not to lose it, especially when the carburetor is flipped upside down for cleaning.


Flip the carburetors upside down, unscrew the idle speed knob bracket and move the idle speed knob out of the way. Make sure the area around the float bowl is completely clean before opening.


I had to partially remove one of the overflow hoses to get to one of the bowl screws. The bowl screws on this set of carburetors have been replaced with hex bolts from the Holeshot stage 1 kit, and are considerably easier to remove than OEM. The OEM screws are held in with threadlock and extremely difficult to remove without stripping. To get them out the first time I had to use an impact screwdriver and hammer.


With the screws out, remove the float bowl cover, which exposes the jets and floats.


Using B-12 Chemtool, spray out the bowl cover, air dry with compressed air, and set aside.


One at a time, remove each of the jets with a flat screwdriver, spray it out with B-12, spray out the port underneath, and air dry the jet and the port with compressed air. Then reinstall the jet so it's snug but not overly tight.


Unscrew the float screw, lift and remove the float and float needle. Spray out the needle seat and needle with B-12.


Air dry the seat and surrounding area with compressed air. Carefully inspect floats and needle for dirt and wear.


Making sure everything is clean and dry, screw in the bowl cover so the bolts are slightly snug but not too tight.


Turn the carburetors over and carefully replace the diaphragm, making sure the o-ring is in place. Put the spring back in cut side down, then screw down the black cap. Make sure diaphragm is not pinched between cap and carburetor body.


Repeat for carbs #2 - 4. In the bottom of bowl covers #3 and 4 I found a gasket fragment, or some other piece of black debris.


Reinstall the idle screw bracket if it's still removed, and reinstall any hoses that were removed. Make sure everything is clean. Put a bead of WD-40 or Tri-flow around the outside edges of each of the 4 air intake ports at the back, and the air/fuel ports on the front, to prep the carburetors for reinstallation.


Saturday, March 12, 2016

Bandit 1200 Carburetor Cleaning Part 1 - Carburetor Removal

Bandit's warm-up problems continued to get worse. Crappy idle, bad mileage, cylinders cutting out. No amount of SeaFoam or StarTron seemed to help so I decided to pull the carbs and clean 'em out.

Required supplies are a can of Maxima contact cleaner and a can of Berryman's B12 Chemtool.

Allow a couple of hours to remove the carburetors from the bike.

Easy stuff: remove seat, tank, side panels. Remove the tank bracket behind the air box.


Remove air box bolts.


Adjust throttle cables for maximum slack at the right grip, the remove 3 screws from throttle housing and disconnect throttle cables at the grip.


Pull throttle position sensor connector at the right side of the carburetor.


Disconnect choke cable at the carburetor end.


Loosen air box clamps.


 Loosen clamps at the intake boots.


There is an overflow hose on each side of the carburetor that needs to be unclamped.


Remove vacuum hose from carburetor 4.


Loosen throttle cables at the carburetor end. Pull the air box back toward the rear of the bike, disengage it from the carburetor air intakes. Pull the carburetors toward the back of the bike, and down, to release them from the intake boots. This requires some force.


Put a rag over the engine to protect the paint, then pull the carbs out on the right side of the bike.


Be careful of the overflow hoses.


With the carbs halfway out, remove the front (push) and rear (pull) throttle cables.


The rear throttle cable can be difficult. Removing the fuel hose can help free space to remove it.


Finally remove the carburetors the rest of the way.


My Bandit's carburetors are covered in black grime--old gas and dirt.


Note: it is highly recommended to wear eye protection before using any type of aerosol spray cleaner!

I zapped the exterior with contact cleaner, trying not to get any in the round ports on either side. After using up an entire can it was cleaned up pretty well.


 Stay tuned for part II, cleaning jets and float bowls.