Tools & Supplies Required
- 24mm socket - rear axle
- 12 & 14mm sockets
- 10, 12, 14mm combination wrenches
- needle-nose pliars
- Torque wrench
- multi-purpose lithium grease
- solvent
- wood block, cardboard
Begin with the bike on the side stand. Start by tying a reminder to the rear brake so it's not accidentally pressed when the wheel is off.

On the left side, remove the cotter pin and loosen the rear axle with the 24mm socket.

On the right side, loosen the 2 brake caliper bolts - 12mm.

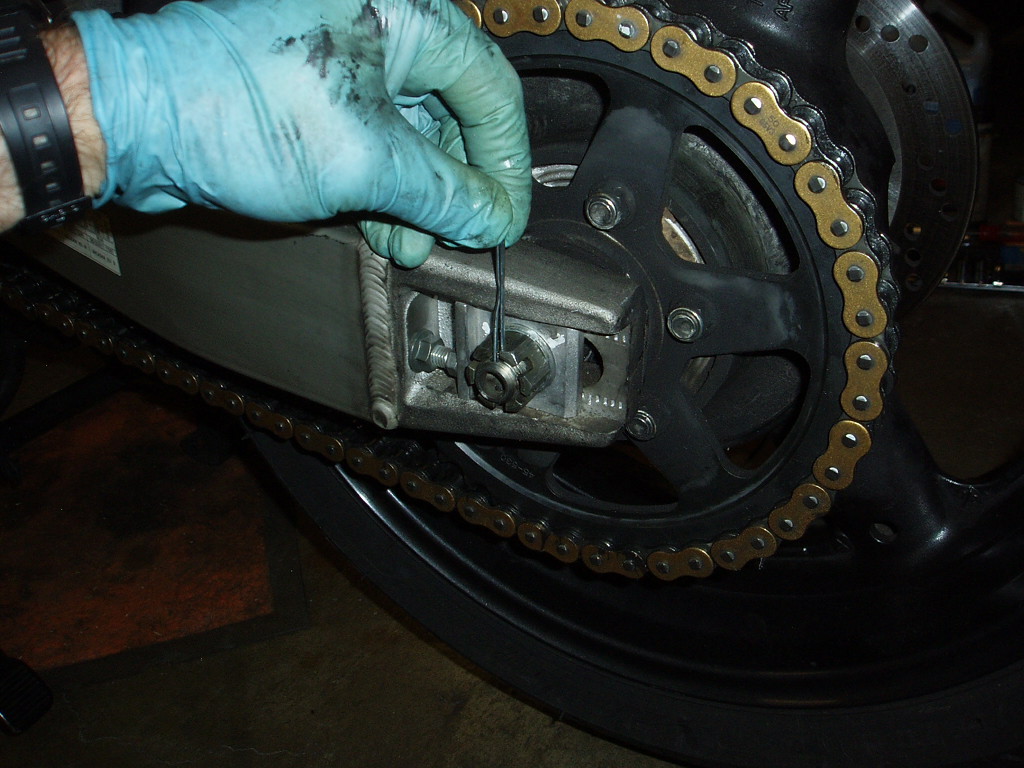
Loosen rear brake torque arm (upper nut in photo, bolted to black U-shaped connector) with a 14mm socket in back and 14mm wrench on the nut.

With all that out of the way the bike can be put up on the center stand.
Loosen the chain adjusters on each side. The lock nut is 12mm. On the right (muffler) side, loosen the lock nut by turning up. On the left side, loosen the lock nut by turning down. Then loosen the adjusters with the 10mm wrench--turn them the opposite direction as the lock nuts.

Push the wheel forward and prop it up underneath with the wood block.

Remove rear axle nut, washer, and left side chain adjustment block, noting orientation of each.


Optional, but makes chain adjustment easier--remove chain guard.

Remove rear brake caliper bolts.

Rotate the rear caliper down a bit to free the brake rotor.

All nuts, bolts, spacers, etc. removed should be cleaned in solvent.


Pull the chain from the rear sprocket.

The wheel can be pulled out by angling it toward the left side of the bike, and kind of wiggling it out of there.


For tire service the rear sprocket can be pulled straight up and out of the left side rubber mounts.


Congratulations, your wheel is off.
Reinstallation
Reinstallation is basically the opposite of removal.
Push the rear sprocket back into the rubber mounts. If it's stubborn a little tire lube or other water-based lube will help it go in.


Clean and re-lube the axle and wheel bearing cover/spacers with multi-purpose lithium grease.


The next part of the job is a lot easier with a helper.
Position the wheel back in the swingarm and prop it up on the block. Reinstall the chain on the sprocket.


Position the axle and right-side chain adjustment block, and push the axle through. It should go in easily. If it doesn't go don't force it. Reposition the wheel and try again it it gets stuck.


Push the brake caliper over the rotor and finger tighten the mounting bolts.

Crank the axle nut down about halfway so there is still freeplay in the wheel.

Quick & Dirty Chain Adjustment
You can spend as much time as you want making sure the wheel is on straight and the chain tension is correct. Strings, laser sights, rulers, levels, etc. However, my experience with the Bandit's chain adjusters is that they aren't well-enough machined for precision adjustment, and I've just had to tolerate the fact that Bandits go through chains faster than other bikes.
Tighten the chain adjusters an equal amount on each side. Use the marks on the end of the swingarm as a guide. Crank them down until there is about 1.5" freeplay at the loose part of the chain under the swingarm. When you check the freeplay the chain should be able to just touch the front end of the swingarm.

When the adjuster blocks are even, tighten the lock nuts with the 12mm wrench while holding the adjuster nut in place with the 10mm socket. Left side lock nut tightens up, right tightens down. Snug down the axle bolt and re-check chain tension. It will probably be a lot tighter. Freeplay should be about 1", which is tight enough so it will almost touch the front end of the swingarm, but not quite. If it's too tight, undo everything and loosen up the adjusters maybe a quarter turn. Shove the wheel forward as hard as you can, then tighten everything up and check again. When the chain tension feels Ok, sight down the chain toward the front of the bike while rotating the rear wheel counter clockwise (normal forward travel direction). Chain should move easily and travel straight. It should not wiggle or appear to travel off at an angle.

If everything looks Ok it's time to torque everything down.
Torque the rear axle nut to 74 ft-lbs and re-insert the cotter pin. It's Ok to re-use it once in spite of what the manual says. I've never had one break.
It's Ok to loosen the axle nut just a little to line it up with the hole in the axle for the cotter pin. Conventional wisdom is to tighten the nut to get everything to line up, but I've had much worse luck over-torquing things on Bandits, than leaving things a little under-tightened.
It's Ok to loosen the axle nut just a little to line it up with the hole in the axle for the cotter pin. Conventional wisdom is to tighten the nut to get everything to line up, but I've had much worse luck over-torquing things on Bandits, than leaving things a little under-tightened.


Torque the rear brake caliper bolts to 18 ft-lbs, and the torque arm nut to 26 ft-lbs.

Re-attach the chain guard, and remove the rear brake reminder cable.


And don't forget to thank your helper!

ReplyDeleteısparta escort
kıbrıs escort
manisa escort
escort izmir
niğde escort
ReplyDeletesakarya escort
sivas escort
yalova escort
izmir escort
ReplyDeleteİzmir escort
buca escort
aliaga escort
kordon escort
odemis escort
olgun escort
azgin escort
alsanak escort
bornova escort
konak escort
basmane escort
balcova escort
cesme escort
kusadasi escort
güzel izmir escort bayanlar arasında izmir escort kızları gerçek izmir partner bayanları izmir escort kızlar bir tık ötede
ReplyDelete