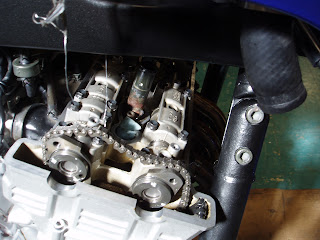
Thanks to the FZ1 list I had a path forward for reinstalling the cams. I tried to make progress during the week but that's always difficult due to my work schedule. However I was optimistic that I'd have the bike back together by the end of the weekend.
Even with help from the list installing cams is frustrating. There are guide holes in the cams that are supposed to line up with marks on the cam holders when the signal generator "T" mark is aligned with the guide mark on the frame (Cylinder 1 at TDC on compression stroke). However due to valve spring pressure the camshafts don't rest flat in the engine. At first I thought I must have bent them somehow. But they weren't bent, they just rest at an awkward position with some of the cam lobes touching the valve lifters, lifting the cam out of the journals. The cam position shifts as the cam holders are tightened down. So the camshafts may start perfectly aligned with the marks on the cam holders and shift as they're tightened into position. Also, between the two cams there are 6 cam holders and 28 bolts, all of which need to be tightened in order, starting from the inside working out, with great care, in multiple stages to 88 inch pounds. In other words, numerous possibilities for stripping threads, rounding bolts, and causing other damage to the cylinder head. I was eventually able to get the process down to about an hour per cam, tightening finger-tight first, then in stages to 55 inch pounds, then in stages to 88.

Cams bolted in with cam sprockets removed
Guide marks visible on right side (exhaust) cam if you look closely
Note: During this process it is important to keep track of the location of the cam chain. It will want to fall toward the front of the bike, in front of the intake cam, during cam installation. Once the intake cam is installed, if the chain is in front of it, it is not possible to reposition it toward the outside of the cam where it belongs. The intake cam then has to be removed and reinstalled, which in my case took another few hours after realizing this.

Intake cam guide marks
Can be seen behind coolant pipe
With the cams bolted in the sprockets can be bolted in underneath the cam chain. The exhaust sprocket goes first, wrapping the chain around it as tightly as possible. A single bolt goes in the sprocket, finger tight, to attach it to the cam. Then the intake cam sprocket, also bolted in with a single bolt finger-tight. If the bolt hole in the intake sprocket does not exactly line up with the hole in the cam while the sprocket is meshed with the cam chain, it means one or both of the cams are not aligned correctly and must be repositioned and reinstalled. I had to do this more than once, taking at least an extra hour her per cam. However this does make it more difficult to reassemble the engine with the timing wrong.
Assuming one gets past that hurdle the cam chain tensioner must be reinstalled before the engine can be turned to attach the second sprocket bolt on each cam. There is a procedure in both manuals for retracting the tensioner with a small flat head screwdriver so it can reinstalled in the engine.
Having done that, if the valves have already been re-checked the cam bolts should be backed out one at a time in order to apply a small bead of blue threadlocker, then torqued down to 17 ft. pounds. If, as in my case, the valves need to be re-checked, the bolts should be torqued to spec without threadlocker as the cams may need to be removed again.

Cams and sprockets reinstalled, finally
But not for long...
Having finally reinstalled the cams I checked the valve clearances again and discovered two exhaust valves that were tighter than I'd like, two more I'd adjusted that were still too tight, and two intake valves that were too tight. Looking at my supply of shims I realized I was out of 1.75mm and 1.80mm shims with only 30 minutes till the local dealer closed. So I set out for the shop by bicycle and cleaned out their supply of those two sizes. Upon returning I set about removing the cams again. Another day gone.
Sunday 03/04 I did the second round of shim math and swaps, reinstalled the cams twice after getting the engine timing slightly off the first time, and rechecked clearances again. I still had four exhaust valves that were tighter than I'd like, right on the edge of spec. So I was faced with either removing the cams again and shimming the four marginal valves the following weekend, or deciding the situation was improved to my satisfaction and to take no further chances stripping threads or dropping shims in the engine. I decided on the latter, wisely, I think.

nice blog.Dev Precision Engineers is the brand that is synonymous with the export and manufacture of Engine spares and parts Engine Valves and Guides.
ReplyDeleteI just finished this job on my own bike. 130,000 miles. Six valves were out of spec. It took about 10 hours and made me miss my Bandit - a lot less in the way of the valve cover, no draining the coolant - and! - screw/locknut adjusters. Yes you have to do it every 8,000 miles, but it only takes about an hour.
ReplyDelete