I was anticipating this day without much enthusiasm as my Yamaha approached its second valve adjustment interval at 52k. The local dealer quoted $540 in labor plus parts to do this service so I figured I'd end up doing it myself. The last time I checked valve clearances on the FZ1 it was out of commission for 3 weeks and I didn't even pull cams to replace shims. This time I knew I'd have to because the specs were on the tight side several years ago at 26k. Ultimately with the help of the FZ1 Owner's List I was successful in getting the valves in spec and getting the bike running again, but it was out of service for three full weekends and a vacation day. I learned a lot about the bike and was very humbled as far as any pretensions of mechanical aptitude.
As the mileage approached I bought the gasket set: valve cover, cam chain tensioner, and signal generator cover gaskets, also iridium spark plugs. I double checked my supply of 7.48mm shims, coolant, distilled water, and micrometer batteries. Having done all that I was out of excuses so I took a Friday off work and got started.
The first step after removing the battery is to drain the coolant and remove the radiator. The very first thing that has to be removed is the right side cowling panel to access the radiator cap. I dropped one of the three cowling mounting bolts and spent an hour looking for it. It had landed in a crevice in my hydraulic jack underneath the work bench. Off to a great start.
The tank has to come off (2 bolts, 3 hoses, and an electrical plug) to access the radiator fan's electrical plug. I removed the right side plastic panel in order to access the coolant overflow tank and extract what coolant I could. This was all per Clymer manual.
Next I removed the radiator. This is only two bolts, three hoses, and the fan electrical plug. I had to lube the water pump hose with Tri-Flow in order to get it detached from the radiator, and got a big blob of Tri-Flow in the eye. After spending the next 10 minutes running water into my eye I remembered about safety goggles. Other than that, not too difficult.
Next, the Air Induction System. The AIS is a a spider-like mess of steel and rubber tubing running over the top of the cylinder head cover toward the front of the engine, terminating in a large cube-shaped valve toward the carburetor on one end, and 4 ports near the exhaust headers on the other:

FZ1 AIS System
Photo Courtesy FZ1 Owner's List
It is difficult to remove and even worse to reinstall. Many FZ1 owners remove it permanently using an aftermarket kit, and after this service I considered it. I'm all for clean air, but seriously. This is one of the most difficult parts of the procedure. Thankfully Pat's FZ1 Site has tips for removing it with great photos. The manuals aren't much help. It's still a lot of messing around to thread the big blocky AIS valve through all the other wires and tubes on the bike, but it is possible, eventually. According to Pat's site it is removed via threading through the tubing from the top of the bike, although I managed to get it out from the front of the engine after removing plug wires #3 and 4 and the valve cover right side coolant hose. This is not the way it went back in however.
After AIS removal there was one remaining coolant hose routed through the left side of the cylinder head cover that had to be removed in order to remove the valve cover. That wasn't too bad although some coolant dripped out for awhile.
With the radiator and AIS out it's easier to access the spark plugs so I unplugged them, moved the leads out of the way, and removed them. First I tried a 5/8" spark plug socket and found it was a little tight in the plug recess. Then it got stuck in the plug #1 recess. Panic moment, but after an hour of messing around with a socket extender, a needle nose pliers, and a wire coat hanger I was able to get it out of there. Then remembered last time I'd used the plug socket that comes included in the FZ1 tool kit. This and a 14mm wrench worked much better.

View with tank removed and spark plugs unplugged
After removing the plugs I stuffed shop towels into the recesses to prevent things from falling into the cylinders.
Finally the cylinder head cover comes off by loosening the 5mm hex bolts in a cross-cross pattern starting from the outside. It came out on the right side of the bike.
Next, in order to rotate the engine for valve clearance measurement, I removed the signal generator cover (5mm hex). Some oil seeps out of the engine when the cover is removed, so I put a drain pan underneath it. There are two long bolts, one at the top and the other at the bottom of the cover. Also a wire clip and a metal locating dowel that keeps the plastic cam chain guide in place. The locating dowel goes through a hole in the chain guide which aligns with a hole in the engine. The procedure calls for removing the cam chain guide which I didn't do. It's possible I should have as it was difficult to get the chain guide lined up to put the locating dowel back in. From the last photo you can see the cam chain guide hole is out of alignment with the guide hole in the engine.
Here are some views of the bike with the removal steps completed:


Front view: radiator, AIS, valve cover removed
Corrosion from two Salt Flats trips

Cam position for cyl 1 intake and exhaust valve check
Cylinder 1 at TDC on compression stroke
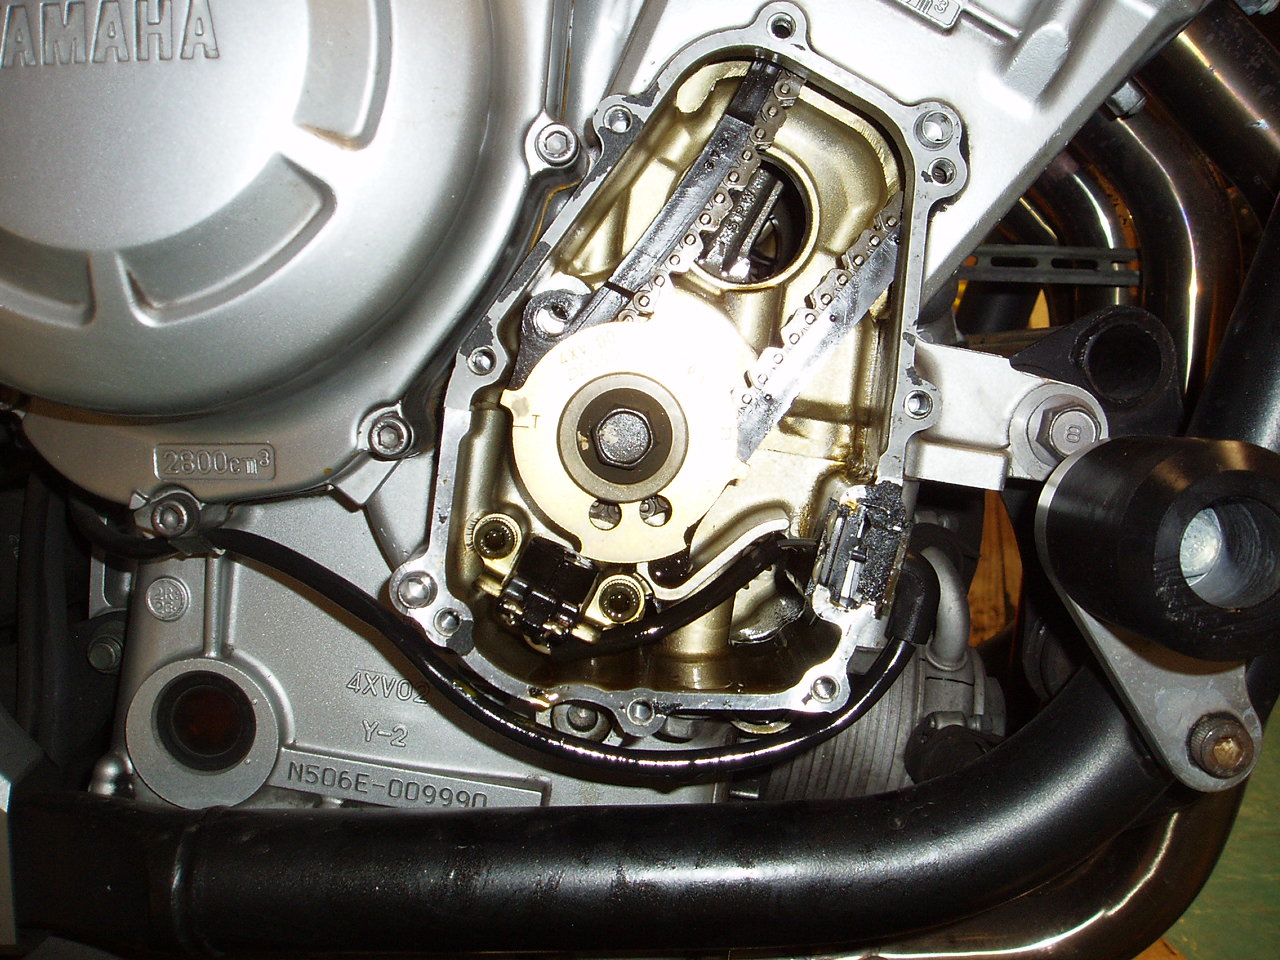
Signal generator in position for clearance check on cylinder 1
Note position of "T" mark
Having completed disassembly about 8 hours into it, I called it a day.
Oh my goodness! an incredible article dude. Thanks Nevertheless I am experiencing problem with ur rss . Don’t know why Unable to subscribe to it. Is there anybody getting similar rss drawback? Anybody who knows kindly respond. Thnkx casino bonus
ReplyDeleteI have an 08 is it basically just the same steps or anybody know where I can download a manual?
ReplyDeleteAlso has anybody tried to put it into diagnostic mode and it won't all it does is show the gas bars and nothing else?
ReplyDelete